Wildcatting the Savage 110/10
PART 2 - Building an AI
The following describes the building of a Savage 22/250 AI. The same procedure can be used to build other AI caliber rifles (6mm AI, 257 Roberts AI, etc.). Disclaimer - this is mad dangerous! Especially the fire forming of cases! Safety glasses or goggles are required and full face protection is recommended. Use only new factory cases for fire forming! It is not enough to follow the below directions. You must understand what you are doing and why, to be safe.
Materials:
The following material will be used for this project: A 22/250 barrel
(preferably longer than 24" to take advantage of the extra case capacity),
a 22/250 go headspace gage and a 22/250AI go headspace gage, a 22/250AI chamber
reamer, a straight edge, caliper or (preferred) depth micrometer, a set of
good files, a 0.020 inch feeler gage, a hacksaw and a reamer holder. A medium
sized tap holder will serve as the reamer holder. The most expensive item
is the chamber reamer. Reamers can be bought new, bought used (eBay) or rented.
See here for more info.

Another item required is a means to hold the barrel while you are working on it. A vise along with wood blocks is the usual recommendation. I have one of those workmate tables with the handles for clamping long wood pieces . I find it great for holding barrels horizontally for cutting or vertically for reaming and face filing.
The Plan:
The chamber reamer will need to be run in deep enough to completely
replace the existing cartridge shoulder with the new 40 degree shoulder. Consulting
a good reloading book, one can see that total case length minus neck length
and shoulder length leaves a little less than 0.2 inches, which we will increase
(for safety) to .25. Therefore we will need to run the reamer in at least
.25 and shorten the barrel by a similar amount. Therefore we will start by
shortening the barrel by .25 inches.
Prior to any work, you should make sure that you can back off the barrel lock nut by enough to take up for the shorter barrel. Most factory barrels have enough extra threads for an AI conversion. However, if you don't, there are two options - either extending the threads slightly with one of the "thread chasing" dies or shortening the barrel nut. To lengthen the threads use plenty of oil and go at it a very little at a time. (The Brownells die is adjustable and much better for this than the Wheeler Engineering solid die.) To shorten the nut cut off as much of the front section as needed with a hacksaw, and then file the edge smooth. Clean up any burrs on the threads with emery paper, making sure the nut threads on to the barrel very easily without any "grabbing". Here is a picture of a nut (the one in the middle) shortened as much as possible for a more radical conversion - rechambering a 308 barrel for 7.62X39!

Step 1 - Shorten Barrel at Chamber End
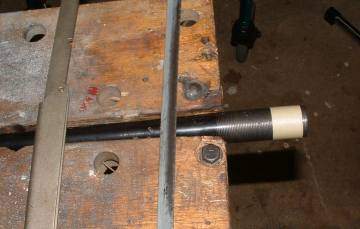 Mark off the amount
of barrel to be removed with a piece of masking tape. Measure carefully -
you don't want to remove any more barrel than necessary, but you need to remove
enough for the reamer to have cut a completely new chamber when the bolt clearance
is correct.
Mark off the amount
of barrel to be removed with a piece of masking tape. Measure carefully -
you don't want to remove any more barrel than necessary, but you need to remove
enough for the reamer to have cut a completely new chamber when the bolt clearance
is correct.
Once you know how much to cut, mount the barrel horizontally and start cutting with the hacksaw 1 full thread before the tape. You will be leaving a little extra metal to be removed when the barrel face is cleaned up. Cut slowly and try to cut as straight as possible. If you start to cut either into or too far away from the tape - stop. Rotate the barrel and begin cutting form a different spot on the barrel circumference. When you cut all the way through, the results will no doubt look horrible, so it is time to clean up the barrel face.

Step 2 - Clean up the Barrel Face
Mount the barrel vertically as rigidly as possible. You should start with
the coarse file and clean up the high spots, using the tape as a guide. Once
the face starts to even out put the 22/250 GO gage into the chamber and then
measure all around the circumference of the gage with a depth micrometer or
caliper. Mark the high spots with a marker and file those spots with medium
and fine files. Even out the face of the barrel away from the gage using the
straight edge to pick out the high spots. Mark those spots with a marker and
file with the fine file.
Take your time and you should be able to even out the face of
the barrel to within a few thousandths. When you are satisfied with the face,
and if you are flush with or below the tape, remove the tape and clean up
the threads by running a fine file along the edge of the barrel to remove
any burrs.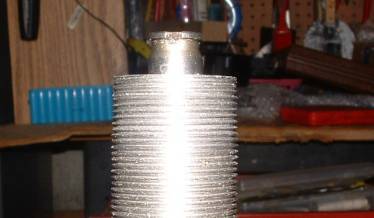
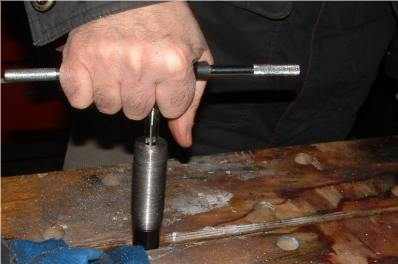
Step 3 - Hand Ream Chamber
Carefully mount the reamer in the tap holder. Put some newspapers under the
barrel to catch oil drippings. Layout some rags near the barrel to put the
reamer down on. Never lay the reamer on a hard surface (and never turn a reamer
backwards!). Coat the reamer with cutting oil and while turning in the cutting
(clockwise) direction insert the reamer into the chamber. When the reamer
seats into the chamber turn the reamer while holding it firmly making every
effort to push the reamer straight into the barrel without cocking it. You
should feel it cutting metal smoothly without chattering. If it starts to
chatter, remove the reamer, clear the chips and then slowly and with more
force make a cut to eliminate the ridges that were formed.
Clear chips as often as possible (every 5-10 turns) by either brushing the reamer with oil or wiping with a rag. Push chips down out of the chamber with a cleaning rod with patch. Every so often, check progress with the 22/250AI GO Gage and the bolt. Typically it is okay to shoot for a few hundredths clearance between the bolt and barrel face when chambering. However, because we want to maximize case support during the fire forming operation you should shoot for .010-0.020 bolt clearance (check with feeler gage) on the go gage. Here is where you find out how good your barrel facing work was. If there are any high spots take care of them with a fine file as needed. You can also optionally "break" the sharp edge of the chamber with a counter sink, round file or a piece of emery paper.
Now that you are done with chambering, you might want to run the reamer into a piece of scrap barrel to create a chamber gage that is an exact match for your chamber. See more about this here.
Step 4 - Headspace Barrel
Screw in the barrel against the 22/250AI GO gage and tighten barrel
nut to the appropriate torque ( I like mine on the heavy side - 70 to100ft-lbs
+). The bolt should not close on the 22/250 GO gage.
This is where things get a little dicey. What you are trying to attain is
a "crush" fit of the standard 22/250 case in the chamber by a few
thousandths. You should be able to close on a case but it will be tight in
the chamber so as to not stretch backwards at all on firing. This is so when
you fire form the case, the shoulder will be blown out with no stretching
of the case in the critical web area.
You may either want to check a few cases with the bullets pulled (never chamber a live round at home!) or take your tools to the range to adjust headspace. You will need to loosen headspace if you can't chamber the rounds. You should tighten headspace if you feel any rounds chamber without some resistance.
Step 5 - Fire forming Cases
According to the literature, the safest way to fire form cases is with a load
of very fast pistol powder behind a filler material such as a wad of wax or
some cream of wheat. (No bullet!) I had a bunch of fired cases in 22/250 so
I gave it a try recently. I didn't have the recommended powder (Bullseye)
but used a similar but slightly slower burning powder (Unique) I use for cast
bullet loads. Starting with the recommended loads and paste wax in the neck
all I ended up with is some slightly lopsided cases. I tried more and more
powder and eventually got cases that looked usable, but still didn't have
the sharp 40 degree shoulder. One drawback - the powder and wax made a mess
in the barrel that had to really be scrubbed out with allot of solvent.
The other way to form cases is to fire a factory round in the chamber. I had a few rounds of factory loads so I gave this method a try as well
To fireform with factory ammo, first check (at the range!) cases chamber but with some resistance. (There should be a visible mark at the base of the necks on unfired extracted cases where cases were forced against the chamber wall.) Then, as with all 'first time' tests set up the rifle with sandbags and a 20' string and fire the rifle from a safe distance. Check the case for any signs of bulging, lose primer pockets, leakage, etc. If all looks good you can continue to fire form the cases, shooting at a target to check accuracy, but wear goggles (or good shooting glasses with side shields) in case of a head separation.
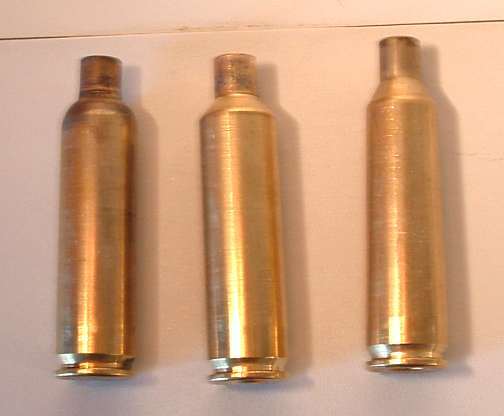 When I fired the
factory case, I got a perfect AI case with nice sharp case neck definition.
Here is a comparison of a case formed with just powder, a factory load fired
in the AI chamber and a fired case from a regular 22/250 for comparison
When I fired the
factory case, I got a perfect AI case with nice sharp case neck definition.
Here is a comparison of a case formed with just powder, a factory load fired
in the AI chamber and a fired case from a regular 22/250 for comparison
Once your cases are fire formed, consult a good reloading manual before commencing load development.