Home Made Chamber Gage
If you buy or rent a chamber reamer for chambering a barrel, before you return it or sell it off, use it to make this handy gage for checking your reloads.
How to make it:
Get a piece of barrel, preferably from the same barrel you chambered
for you rifle. The longer the better. As a minimum, it should be long enough
to extend just a little past the distance from the shoulder of your cartridge
to the tip of a standard sized bullet.
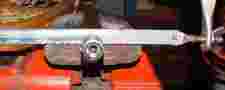
Square up the ends of the barrel best you can. (If you have any kind of a lathe this is no sweat.) You can chuck it in a drill press and square up the ends with a file, or better yet you can use a piloted tool like one of Brownells barrel crowning tools.
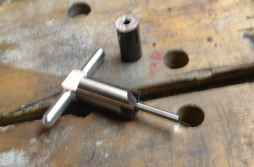 Here
is a picture of Brownells 90 dgree facing cutter along with a barrel studb.
Here
is a picture of Brownells 90 dgree facing cutter along with a barrel studb.
Holding the stub securely in a vise or barrel blocks, run the chamber reamer in as carefully as possible. Here is where a longer piece of barrel is an advantage as it is easier to hold and will support the reamer pilot. You only need to run the reamer in deep enough to cut the chamber shoulder into the end of the barrel.What you want is to cut a duplicate of the end of your chamber.
If you started with a longer piece of barrel, cut it back to extend just a little past the distance from the shoulder of your cartridge to the tip of a standard sized bullet. Square up the end as best you can.
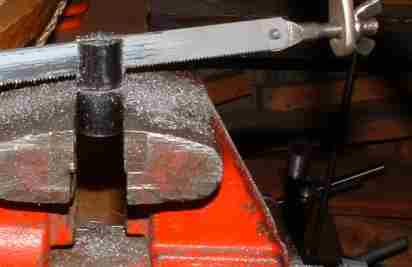
Finally, with a hacksaw cut halfway into the barrel at a point just after the end of the chamber. Then holding the barrel stub vertically cut down the barrel lengthwise with the hacksaw to remove a cross section of barrel just after the chamber. Clean up and square the edges with a file. (If your lucky enough to have access to a milling machine - just mill out the section.)
How to use it:
Insert the same headspace gage you use to set your rifles headspace,
(typically "GO") and with a caliper measure the distance between
the end of your gage to the base of the headspace gage. Write this distance
down. It is the reference "headspace length" for your chamber. Your
sized (full or neck sized) cases (when inserted into your gage) should come
to either just below this length to no more than .001 inch longer. Other wise
they will be hard to chamber. If they are shorter by more than .004 inch,
you are oversizing the cases too much leading to short case life. Adjust your
full length die accordingly.
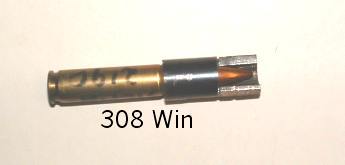
Look at the end of the case through the sectioned out area of the gage. You should see some clearance between the end of the case and the neck of the chamber.
You could perform the above measurements with a commercial case gage like a Wilson or Forster. Where this home made gage really comes in handy is in checking your loaded rounds. Insert the loaded round into the gage. The cartridge should slide in smoothly with no resistance in the neck. (However, if there is evident play in the neck and you are neck turning and/or neck sizing you might want to consider steps to increase neck thickness.)
The bullet should be seated out to just touch, or be no more than a couple of hundredths back from the rifling. Rotate the cartridge. The bullet should show no run out ( wobble). With this gage you have a starting point to experiment with your reloads to adjust bullet seating for the best accuracy.