Savage 110/111/112/10/12
Firing Pin Spring Change Procedure
Introduction:
The firing pin assembly on a Savage bolt action is relatively light,
and therefore must be moved at fairly high velocity to insure reliable ignition.
Symptoms of insufficient firing pin striking energy include misfires (especially
at low temperatures) and poor accuracy. Primer indentations should be at least
.04 inches deep.
Often shooters will lubricate the bolt cocking ramp with something like STP in order smooth out bolt operation. However, if the lube gets in between the firing pin assembly and the bolt body it will slow down the firing pin. When it gets cold the oil viscosity will increase causing misfires. This can be corrected by removing the firing pin assembly, cleaning the assembly and all other parts with solvent, and reassembling with either a dry lubricant or very light oil sparingly applied to the cocking pin.
Note that incorrect trigger adjustments can also cause decreased firing pin energy, by interfering with the sear movement. In particular, some shooters may adjust the trigger to minimize backlash with the result that the trigger interferes with sear movement. Take a look at the trigger just beyond the point where the sear is released and see if there is any scraping marks. If so, increase backlash and see if it corrects the ignition problems.
If all else fails, Wolff replacement springs can be purchased form Brownells, or directly from www.gunsprings.com. In addition to direct factory replacements, they can be purchased with heavier weights if desired.
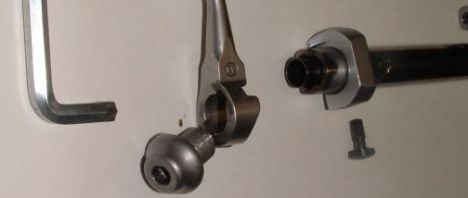
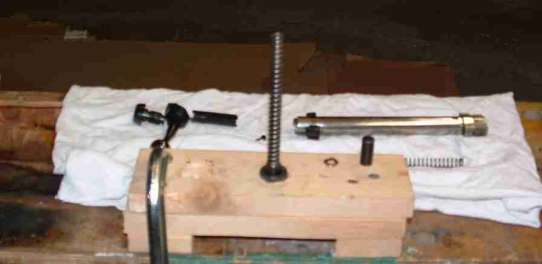
Remove Firing Pin Assembly:
Start by removing the bolt assembly screw from the back of the bolt.
The bolt shown below has an Allen (Hex) type bolt assembly screw. Older models
are provided with a simple slot. Unscrew it all the way out. You may want
to mark the bolt handled and body to simplify reassembly. The cocking piece
sleeve which retains the cocking piece pin can now either be removed (older
models) or moved back so that the cocking piece pin can be removed from the
striker assembly as shown below...
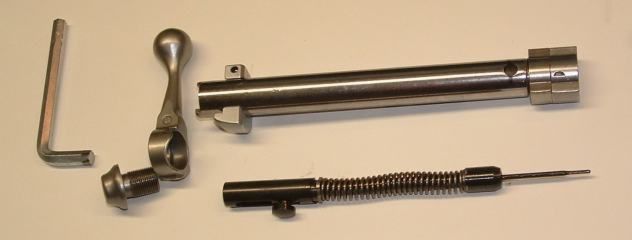
 With the pin
removed, the striker assembly can now just slide out.
With the pin
removed, the striker assembly can now just slide out.
Note that below the cocking pin is shown below reinserted. You would not do that when removing the firing pin spring.
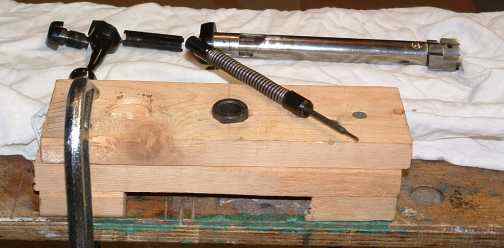
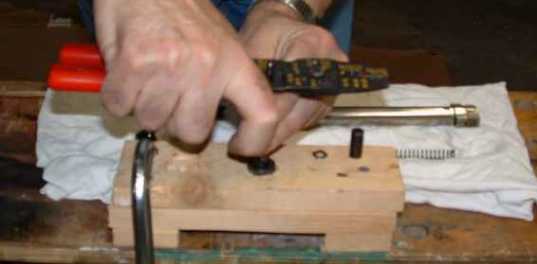
Removing the Old Spring:
Changing the spring will require compressing the spring with some
force. Care must be use to insure that the relatively light pin is not bent.
I happened to have a decaping shell holder from a Lee Loader mounted in a
piece of wood. I am able to use this to support the firing pin assembly without
having to rigidly clamp it in the vise.
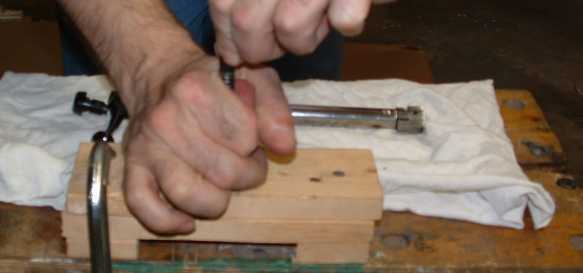
The first step in removing the old spring is to compress the spring to relieve tension on the spring retaining nut at the end of the firing pin assembly. As shown below, I found that if I just grasped the spring and pushed down I could unscrew the retaining nut by hand. If you find the nut is on too tight you can insert a punch or small screw driver into the cocking pin hole to provide more leverage. Hold onto the spring so that the retaining nut and D washer don't go flying when the nut releases from the pin.
Slide the D washer, and spring off the pin and slide the new spring on.
With the firing pin spring removed, you can check firing pin protrusion by dropping the pin into the bolt body and measuring protrusion with a caliper or depth micrometer. Protrusion should be .05-.062 inch. To adjust, move the lockwasher up the pin and turn the stop nut to increase or decrease protrusion. Make sure the teeth at the back of the nut line up with the teeth on the lock washer. When the spring is installed it will keep the lock washer pushed against the stop nut.
Installing the New Spring:
To replace the D washer and spring retaining nut it will be necessary
to compress the spring. Since I went with the heavier than factory Wolff spring
I needed a tool of some kind that I could push against the spring but provided
clearance to slip over the end of the firing pin. I found that the coax stripping
notch in a hand crimper provided the clearance I was looking for.....
I was able to easily compress the spring enough to slip on the D washer and screw the spring retaining nut all the way down.
The last adjustment to make is the firing pin spring retaining nut has to be adjusted to provide at least .02 clearance between the cocking pin and bolt body when the firing pin is all the way down. Rather than measure exactly, I just made sure that there was some 'wiggle' room when the pin was all the way down. After you get the clearance you want, line up the teeth on the D washer with the teeth on the cocking pin sleeve with the sleeve slot line up properly with the cocking pin. Line this up by unscrewing the nut so that you don't eliminate your pin/bolt body clearance.
To re-assemble the bolt, put the firing pin assembly in the bolt body, insert the cocking sleeve and pin, put the cocking pin up on the top of the cocking ramp (so the bolt can be inserted) and reinstall the bolt assembly screw.